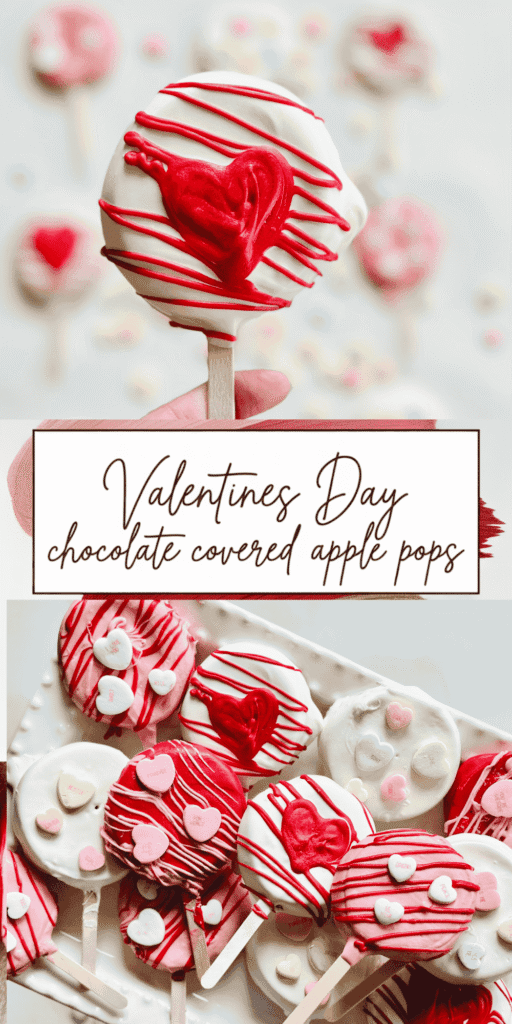
Looking for an easy, cute, and mess-free Valentine’s Day dessert? These Chocolate Covered Apple Pops are fun Valentine treats that work as classroom treats, a sweet kids activity, and a simple finger dessert all in one.
Fresh apples dipped in chocolate and decorated with sprinkles or hearts make adorable single-serve desserts that are easy to prep, easy to serve, and easy for kids to enjoy.

They’re perfect for Valentine’s parties, school celebrations, and family dessert tables.
You can make them anytime for kids’ birthday parties, baby showers, or party buffets. These chocolate apple pops are make-ahead friendly, portable, and great for dessert boards, party trays, and grab-and-go treats when you need something festive but effortless.
Don’t Miss These
Chocolates Covered Pretzel Rods With Sprinkle – Valentine Day Treat
10 Super Cute Valentine Treats Ideas
Heart-Shaped Rice Krispie Treats and Pops
Ingredients You'll Need
4 Honeycrisp apples
1 cup dark chocolate chips
1 cup white chocolate chips
¼ cup pumpkin seeds
¼ cup shredded coconut
¼ cup dried cranberries
¼ cup raw walnuts
2 tablespoons sprinkles
2 teaspoons coconut oil
Kitchen Helpers
- Microwave-safe bowls
- Double boiler
- Spatula
- Forks
- Parchment paper
- Baking tray
- Wooden cake pop sticks or popsicle sticks
- Measuring cups & spoons
- Small whisk or spoon for drizzling
- Refrigerator or cooling rack
Step-by-Step Directions
- Wash and dry the apples thoroughly. Slice them about ¼‑inch thick so they hold the toppings without breaking. If you want a donut‑like shape, you can cut a small circle out of the centre using a cutter or knife.
- Use paper towels to pat the apple slices dry—this helps the chocolate adhere. Lay them out on a parchment‑lined tray. Now, press a wooden cake pop stick or popsicle stick into one edge gently to make each slice a “pop.”
- Put dark chocolate chips in one bowl and white chocolate chips in another. Add 1 teaspoon of coconut oil to each. Microwave in 30‑second bursts, stirring in between, until smooth and glossy.
- Dip each apple pop into the dark or white chocolate using a fork or the stick. Let excess chocolate drip back into the bowl, then place it on the parchment. Before it sets, sprinkle seeds, nuts, dried cranberries, or coconut over it.
")
- Once all pops are coated, use the opposite chocolate (white over dark, dark over white) to drizzle thin lines across the tops for a contrasting effect. Chill in the fridge until firm.
")

Nutritional Value
| Nutrient | Approx Per Serving |
|---|---|
| Calories | 277 kcal |
| Carbohydrates | 43 g |
| Protein | 3 g |
| Fat | 11 g |
| Fiber | 3 g |
| Sugar | 18 g |
| Vitamin C | 4 mg |
| Calcium | 63 mg |
This treat delivers fibre from apples and antioxidants from dark chocolate, balanced with sweet toppings for joy. Think of it as a dessert with personality, rather than just a sugary bite.
Make It Unique
– Chocolate Choice
Using the right chocolate can make your treats both delicious and allergy-friendly. Opt for vegan or dairy-free dark and white chocolate to keep the recipe suitable for guests with dairy restrictions.
These alternatives melt smoothly and provide the same rich flavor as traditional chocolate, making it easy to drizzle, dip, or decorate your heart-shaped treats beautifully.
– Fruit Swaps
If fresh water peaches aren’t available or you want a different flavor, firm fruits like Granny Smith or Gala apples work perfectly.
Choose crisp, firm fruit to maintain texture, as softer fruits can release moisture and make the treats soggy. Slicing fruit thinly or dicing it into small pieces ensures even distribution while keeping every bite satisfying.
– Extra Toppings
Adding crunchy or colorful toppings elevates both flavor and presentation. Try chia seeds, crushed pretzels, shredded coconut, or even small candy pieces.
These toppings add texture and a visual pop without overwhelming the base, making each heart-shaped treat unique and festive.
– Customization Tips
Think of all your ingredients as building blocks. Mix and match chocolate types, fruit, and toppings depending on the occasion, audience, or your creative mood.
By experimenting carefully, you can make every batch visually stunning and uniquely flavorful while keeping the treats soft, chewy, and perfectly heart-shaped.

Playful Serving Styles
These Chocolate-Covered Apple Pops are a visual delight that can transform any dessert table. Presentation makes a big difference, so thinking about color, layers, and small details helps your treats stand out.
– Dessert Board
Arrange apple pops on a large platter alongside clusters of fresh berries, nuts, and small candies. Mixing textures and colors makes the board visually appealing and inviting.
Place pops at varying angles or heights using small stands or cake pop holders for a layered effect. This method not only looks impressive but allows guests to choose their favorite flavors easily.
– Individual Gifts
Wrap each apple pop in clear, food-safe wrap and tie it with a ribbon, twine, or a small bow. This makes the treats perfect for party favors, teacher gifts, or Valentine’s Day surprises.
You can also add a small tag with a fun message or flavor note to personalize each gift. Individual wrapping keeps the pops fresh and prevents toppings from smudging while making them instantly gift-ready.
– Party Platter
For holidays, birthdays, or themed events, display pops on a platter lined with doilies, patterned paper, or festive mats. Using themed décor adds cohesion to your dessert table and enhances the festive vibe.
Arrange pops in groups by color or flavor to make them easy to grab, while still looking polished and fun.
– Mini Labels & Flags
Add mini flags, toothpicks, or labels next to each pop to indicate flavors, toppings, or dietary notes. This is especially useful for parties with varied preferences, allergies, or for larger gatherings.
Clear labeling adds a professional touch and makes your presentation not just pretty but also practical for guests.
Make-Ahead and Storage Tips
Preparing chocolate-covered apple pops ahead of time can save you a lot of stress while keeping them fresh and delicious. You can slice and dry the apples a few hours in advance, keep your chocolate melted and ready for dipping, and even assemble the pops up to a few days before your event.
Planning in stages allows you to enjoy the process and ensures each pop looks polished and perfect when it’s time to serve.
Tips for Storing & Serving:
- Slice & Dry: Store apple slices in an airtight container with a slightly damp paper towel to prevent browning.
- Keep Chocolate Ready: Maintain melted chocolate in a small slow cooker or insulated bowl for up to 30 minutes.
- Fully Assembled: Refrigerate completed pops in an airtight container for 3–4 days.
- Serving Tip: Let refrigerated pops sit at room temperature for a few minutes before serving so the chocolate isn’t too hard to bite.
Kid-Approved Fun – Make Treat Extra Playful
Turn your heart-shaped Rice Krispie treats or chocolate-covered apple pops into a kid-favorite snack with simple, colorful additions.
Mini candies, edible glitter, or sprinkles instantly make each treat visually exciting and playful. You can mix and match colors to match holidays, birthdays, or school events, creating a rainbow effect that delights little hands and eyes.
Beyond looks, these fun toppings add texture and surprise with every bite, making the snack interactive and memorable. Let kids help sprinkle candies or glitter on top—this adds to the excitement and gives them a sense of pride in creating their own treat.
With just a few extra touches, your simple snacks become a festive, imaginative experience that’s perfect for parties, school events, or just a fun afternoon treat at home.

Chef’s Notes
— First, dry your apples thoroughly before dipping them in chocolate. Any excess moisture can cause the chocolate to slide off or clump, which affects both appearance and texture.
Using a clean kitchen towel or paper towels to pat each slice completely dry ensures smooth, even coverage.
— Next, add toppings while the chocolate is still warm and soft. Sprinkles, nuts, or crushed candy adhere best at this stage, giving a polished look and preventing pieces from falling off later.
Timing is key: wait too long and toppings won’t stick; add them too early and chocolate can become too thin and messy.
— If you’re making a large batch, consider setting up an assembly line. Assign one person to slice the apples, another to melt and dip chocolate, and another to decorate.
This not only speeds up the process but keeps the activity fun and organized, especially when prepping for parties or events.
Frequently Asked Questions
Q1: Can I use other types of apples?
A: Yes! While Honeycrisp apples are perfect because they are sweet and firm, you can also use Granny Smith for a tart flavor or Gala for a sweeter option. Just make sure the apples are firm, as softer apples may not hold the chocolate and toppings well.
Q2: How do I make these pops dairy-free or vegan?
A: Swap the dark and white chocolate chips with vegan or dairy-free chocolate. Check the labels to make sure they don’t contain milk. Coconut oil works perfectly for melting and adding a smooth shine to the chocolate.
Q3: Can I prepare these ahead of time?
A: Absolutely! You can slice and dry the apples a few hours in advance. Melted chocolate can be kept warm in a small bowl or double boiler. Fully assembled pops can be refrigerated in an airtight container for up to 3–4 days. Bring to room temperature a few minutes before serving for the best texture.
Q4: Can I use other fruits instead of apples?
A: Yes! Pear slices or firm strawberries work well, but chocolate sticks best to firmer fruits. Avoid overly juicy or soft fruits, as the chocolate may slide off.
Q5: How do I prevent the chocolate from cracking after it sets?
A: Make sure the apples are completely dry before dipping. Also, drizzle chocolate while the first layer is still slightly soft for better adhesion. Store in the fridge until ready to serve, but avoid long-term freezing, as this may cause cracks.
Q6: What toppings work best?
A: Seeds, nuts, dried fruit, shredded coconut, sprinkles, or crushed candies all work beautifully. You can mix and match to create fun textures and flavors. Just sprinkle them immediately after dipping while the chocolate is still soft.
These Chocolate Covered Apple Pops are a delightful treat that’s as fun to make as it is to eat. The crisp, juicy apples paired with rich, glossy chocolate create a perfect balance of flavor and texture.
With endless options for toppings and colors, you can customize them for holidays, parties, or thoughtful homemade gifts. Loved by both kids and adults, these pops are an easy way to add a little sweetness and joy to any day, turning ordinary moments into something special.

Valentines Day Chocolate Covered Apple Pops
Course: Dessert, Snacks12
servings15
minutes10
minutes25
minutesIngredients
4 Honeycrisp apples
1 cup dark chocolate chips
1 cup white chocolate chips
¼ cup pumpkin seeds
¼ cup shredded coconut
¼ cup dried cranberries
¼ cup raw walnuts
2 tablespoons sprinkles
2 teaspoons coconut oil
Directions
- Start by washing your apples thoroughly under cold water to remove any dirt or wax. Dry them completely with a clean kitchen towel to prevent excess moisture from interfering with the chocolate later. Slice the apples into roughly ¼‑inch thick rounds, which are sturdy enough to hold the chocolate and toppings but thin enough to bite easily.
- Before dipping, it’s essential to remove any remaining surface moisture from the apple slices. Pat each piece gently but thoroughly with paper towels. This ensures that the chocolate will stick properly and not slide off. Lay the apple slices carefully on a parchment-lined baking tray, giving each slice enough space to avoid touching its neighbor. Then, insert a wooden cake pop stick or popsicle stick into one side of each slice, pressing just enough to secure it without breaking the apple.
- Set up two separate bowls for the chocolates: one for dark chocolate chips and another for white chocolate chips. Add a teaspoon of coconut oil to each bowl—it helps the chocolate melt evenly and gives a smooth, glossy finish. Heat the chocolate in 30-second intervals in the microwave, stirring well between each interval. If using a double boiler, place the bowls over simmering water and stir constantly until melted.
- Take each apple pop and carefully dip it into the melted chocolate, using a fork or holding it by the stick. Allow any excess chocolate to drip back into the bowl to avoid messy, heavy coating. Place the dipped apple on the parchment-lined tray. Immediately sprinkle your chosen toppings—pumpkin seeds, shredded coconut, chopped nuts, dried cranberries, or sprinkles—over the chocolate while it’s still soft.
- To add a professional, decorative touch, melt the opposite chocolate (white over dark, dark over white) and drizzle thin lines over each pop using a fork, spoon, or piping bag. This creates a beautiful contrast and makes each pop look elegant and festive. Once decorated, place the tray in the refrigerator for at least 30 minutes to allow the chocolate to harden completely.
Notes
- Make sure your apple slices are completely dry before dipping. Any water or juice on the surface can cause the chocolate to slide off or not stick properly.
- Honeycrisp, Granny Smith, or Gala are ideal. Softer apples may become mushy or break when inserting sticks.
- Add a little coconut oil to the chocolate while melting—it helps make it smooth, glossy, and easier to coat the apples evenly.
- Sprinkle seeds, nuts, coconut, or sprinkles immediately after dipping while the chocolate is still soft. Once the chocolate hardens, toppings won’t stick.
- If making many pops, set up stations for slicing, dipping, and decorating. This keeps the process quick and fun, especially with kids or helpers.