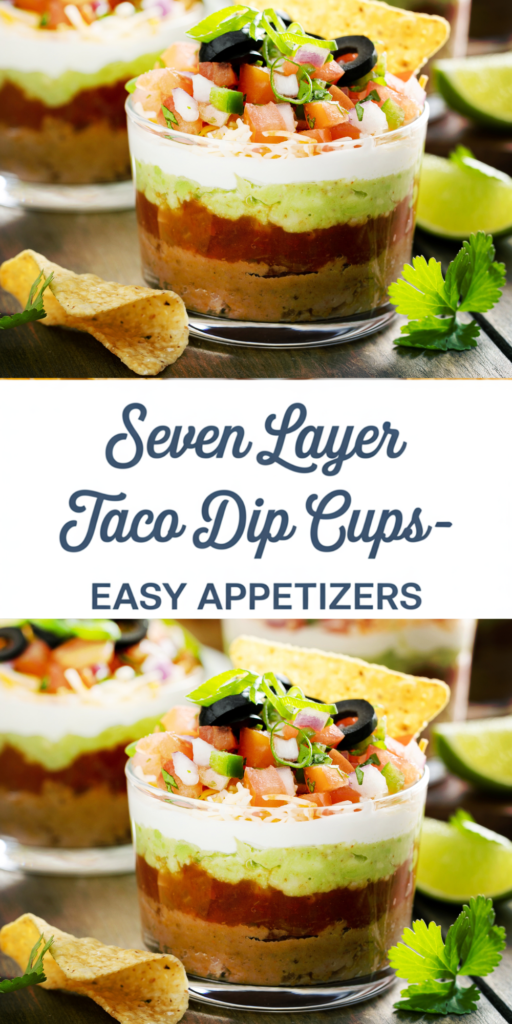
Nothing better than simple appetizers you can make ahead of time — and these Seven Layer Taco Dip Cups are exactly that.
This fun twist on the classic 7 layer taco dip turns a creamy, cheesy layered taco dip into cute individual cups that are perfect as finger food.
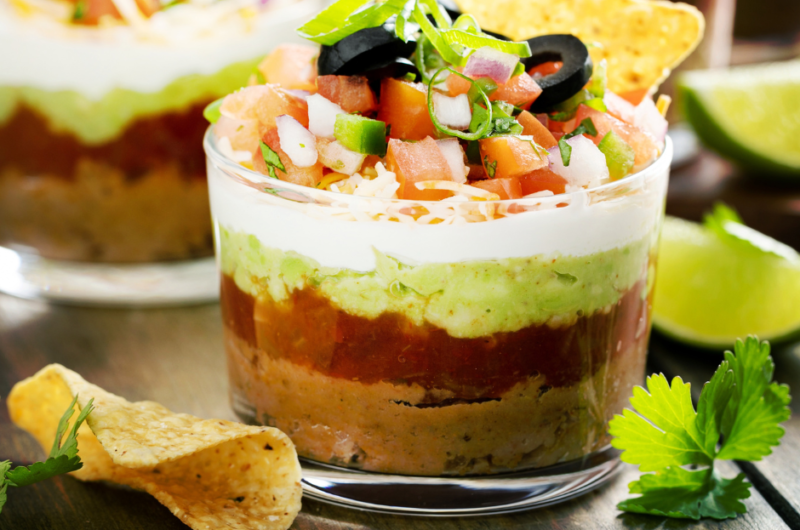
Each cup is packed with all the flavors of an easy taco dip — refried beans, seasoned sour cream, guacamole, salsa, cheese, and toppings — layered beautifully in portable Taco Dip cups with no baking required.
Perfect for a party, brunch, buffet, baby shower, bridal shower, game day, or potluck, these taco dip cups are always a hit.
They’re mess-free, grab-and-go, and ideal for serving a crowd without any stress. If you’re looking for a simple appetizer that looks impressive but takes minimal effort, these seven layer taco dip cups are the perfect make-ahead party snack for any celebration.
These single serve taco dip cups make hosting easy and fun, with no mess and full flavor.
You May Also Like
Smashed Cheeseburger Tacos
Easy Homemade Chicken Taco Seasoning
Air fryer Crunchwrap Supreme in 8 Minutes (Copycat Taco Bell)
Ingredients
1 (16 oz) can refried beans
1 package taco seasoning
2 cups guacamole
8 oz sour cream
2 cups salsa or pico de gallo
1 cup shredded cheddar cheese
2 Roma tomatoes, diced
½ bunch green onions, sliced
1 (2.25 oz) can sliced olives, drained
Tortilla chips
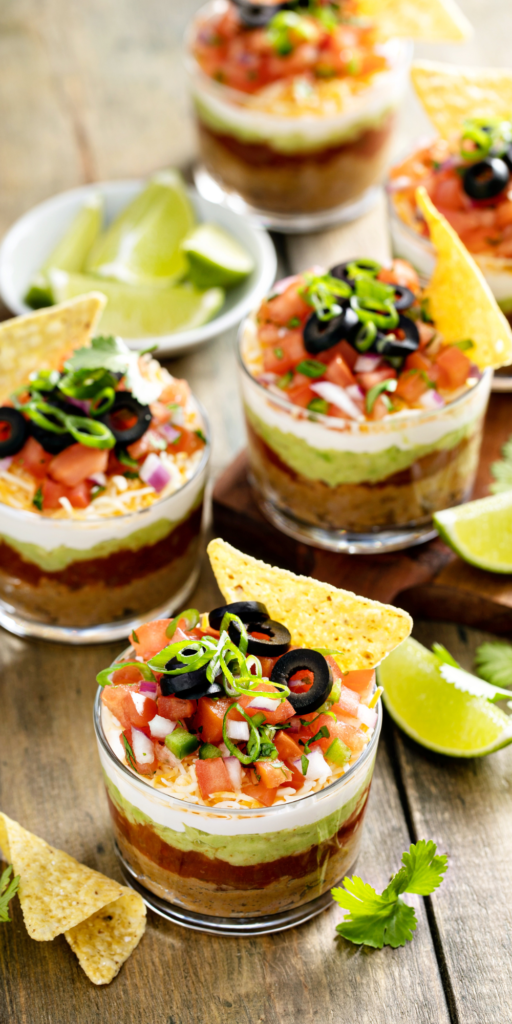
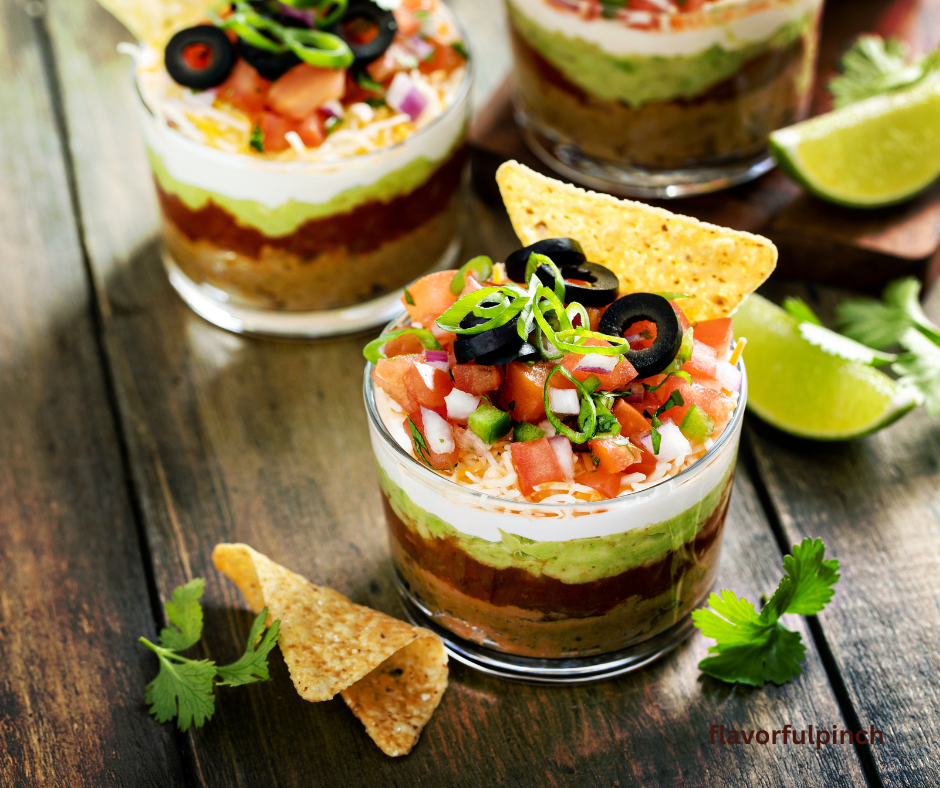
Steps to Build Your Layers
- Start by opening the refried beans and placing them in a medium bowl. Add the taco seasoning and mix well until the spices are fully blended. Take your time here. A smooth, well-seasoned bean layer sets the flavor for the entire cup. If the beans feel too thick, you can stir in a tablespoon or two of warm water to make them easier to spread.
 (1)")
- Spoon the seasoned refried beans into the bottom of each clear cup. Use the back of the spoon to gently level the surface. This base should be thick enough to support the layers above but not packed down tightly. Keeping it light helps the dip feel creamy when scooped.
- Next, carefully add a layer of sour cream on top of the beans. Try to spread it evenly so every bite gets a smooth, cool contrast to the warm spices below. For cleaner layers, you can pipe it in using a zip-top bag with the corner snipped.
- Add a generous layer of guacamole. Spread gently without mixing it into the sour cream. This layer brings richness and freshness, so keep it neat and even across the cup.
- Before adding salsa, drain any excess liquid. This helps prevent watery cups. Spoon the salsa evenly over the guacamole, allowing the bright flavors to shine without soaking the layers beneath. Top the salsa with shredded cheddar cheese. Make sure it covers the surface evenly so each scoop gets a bit of cheesy flavor.
- Add diced tomatoes, sliced olives, and green onions in that order. These final layers add color, crunch, and freshness, making the cups look just as good as they taste. Place the finished cups in the refrigerator until ready to serve. This helps the layers set and the flavors come together. Serve chilled with plenty of tortilla chips on the side.
 (1)")

Ingredient Alternatives
Getting creative with your layers can be exciting and allows this recipe to fit many diets or preferences.
Healthy & Lighter Choices
- Greek yogurt for sour cream for extra protein.
- Black bean mash instead of refried beans for fiber boost.
- Fresh pico over watery salsa to reduce sogginess.
Flavor Enhancers
- Add a sprinkle of smoked paprika or cumin to the beans.
- Mix taco seasoning into sour cream instead of beans for a brighter cream layer.
Textural Twists
- Corn kernels or diced bell peppers add refreshing crunch.
- Jalapeños or hot salsa if you like heat.
Whether you want it lighter, spicier, or more layered with veggies, each swap keeps the heart of this dish intact while letting your creativity shine.
Nutritional Snapshot
| Nutrient | Amount per Serving |
|---|---|
| Calories | ~293 kcal |
| Carbs | 21g |
| Protein | 9g |
| Fat | 21g |
| Fiber | 9g |
| Sodium | 1364mg |
| Vitamin C | 14mg |
This layered dip offers a balance of protein, fiber, and satisfying fat, making it a crowd-pleasing snack that fills without weighing you down.
Creative Ways to Serve
This recipe shines beyond the basic presentation:
- Miniators for Parties: Break out small shot glasses for bite-sized dips at cocktail gatherings.
- Platter version: Spread the same layers in a 9×11 pan for a communal dip everyone digs into.
- Vegetable boards: Surround your cup layer setup with colorful crudités like carrots, celery and cucumber slices.
- Theme stations: Serve alongside tacos, quesadillas, or fajitas for a Tex-Mex buffet flair.
These styles keep guests engaged and provide variety, ensuring there’s something for everyone.
Notes from the Kitchen
Prep ahead with care
You can fully assemble the dip cups up to 24 hours in advance, which makes party prep much easier. Once assembled, cover each cup tightly with plastic wrap or store them in an airtight container.
This keeps the layers from drying out and prevents fridge odors from affecting the taste. For best results, add delicate toppings like green onions just before serving to keep them crisp and bright.
Avoid watery layers
Salsa and tomatoes naturally release liquid. Always drain them well before layering. If needed, place salsa in a strainer for a few minutes or lightly press it with a spoon.
This step keeps the lower layers firm and prevents the dip from becoming soggy at the bottom.
Make layering clean and easy
For smooth, sharp layers, transfer soft ingredients like refried beans, sour cream, and guacamole into piping bags or zip-top bags with a small corner cut off.
Gently squeeze each layer into the cup instead of spooning. This keeps the layers defined and makes the cups look polished and professional.
Choose the right cups
Short, wide cups work best. They allow guests to reach the bottom easily with chips and prevent breaking. Tall, narrow cups may look nice but make dipping frustrating and messy.
Work gently, not quickly
Take your time with each layer. Pressing too hard can mix layers and ruin the visual appeal. A light hand keeps the colors clean and the texture balanced.
Make Ahead & Storage
Because fresh ingredients are essential here, these dip cups are best made no more than a day ahead to preserve the vibrant layers and colors. Guacamole can oxidize over time and salsa may release liquid, which makes early prep less than ideal.
Storage tips:
- Cover cups tightly with lids or plastic wrap.
- Store in the fridge for up to 24 hours.
- Serve chilled with fresh chips.
Prepping the ingredients and assembling shortly before your event keeps each layer visually distinct and delicious.
What Makes This Great
Why do I love these Seven Layer Taco Dip Cups? First, they bring big, bold flavor in a neat, shareable format. Second, they’re endlessly adaptable — perfect for weeknight snacks, big celebrations, or casual gatherings. Finally, every dip hits a satisfying balance of creamy, tangy, and fresh, making them instantly addictive.
Plus, pairing them with warm chips or crisp veggies turns an appetizer into an experience your guests will talk about long after the last cup is gone.
The Final Thoughts
These Seven Layer Taco Dip Cups prove that simple food can still feel special. They are easy to prepare, fun to serve, and full of bold flavors in every bite.
The layered look makes them stand out on any table, while the familiar taco taste keeps everyone coming back for more. Whether you are hosting a party, planning a family get-together, or just want a quick snack that feels festive, these cups always deliver. No baking, no mess, and no stress—just good food that people genuinely enjoy.
Frequently Asked Questions
Can I make these ahead of time?
Yes. You can prepare the cups up to 24 hours in advance. Store them covered and airtight in the refrigerator. For best freshness, add green onions right before serving.
How do I stop the dip from getting watery?
Always drain salsa, tomatoes, and olives well before layering. This keeps the layers firm and clean.
Can I make this recipe dairy-free?
Yes. Use dairy-free sour cream, dairy-free shredded cheese, and plant-based refried beans. The flavor will still be delicious.
What cups work best for this recipe?
Short, wide clear cups are ideal. They make dipping easier and show off the layers beautifully.
Can I make it spicy?
Absolutely. Use hot salsa, add chopped jalapeños, or mix a little hot sauce into the beans or sour cream.
What can I serve instead of tortilla chips?
Cucumber slices, bell pepper strips, or pita chips work well as lighter options.
Seven Layer Taco Dip Cups
Course: Appetizers, Snacks12
servings20
minutes30
minutes50
minutesIngredients
1 (16 oz) can refried beans
1 packet taco seasoning
8 oz sour cream
2 cups guacamole
2 cups salsa or pico de gallo (drained)
1 cup shredded cheddar cheese
2 Roma tomatoes, diced
½ bunch green onions, sliced
1 (2.25 oz) can sliced olives, drained
Tortilla chips, for serving
Directions
- Place the refried beans in a medium bowl. Add the taco seasoning and mix until the seasoning is fully blended and the texture is smooth. Make sure there are no dry spice pockets. If the mixture feels too thick, add a small spoon of water and stir gently to loosen it.
- Using a spoon, add the seasoned refried beans to the bottom of each clear cup. Spread lightly with the back of the spoon to create an even base. Do not press down too hard, as this can make the dip heavy and harder to scoop.
- Spoon sour cream over the bean layer, covering it evenly. This layer adds a cool, creamy contrast to the seasoned beans. Spread gently to keep the layers separate and clean.
- Add a smooth layer of guacamole on top of the sour cream. Spread carefully so it sits neatly without mixing into the layer below. This keeps the flavors balanced and the layers visible.
- Drain the salsa well before adding it to the cups. Spoon it evenly over the guacamole layer. Removing excess liquid helps the dip stay firm and prevents sogginess.
- Evenly scatter shredded cheddar cheese over the salsa. This layer helps hold the toppings in place and adds rich flavor to every bite.
- Top each cup with diced tomatoes, sliced olives, and green onions. These final layers add color, freshness, and a light crunch.
- Place the finished cups in the refrigerator until ready to serve. Chilling allows the layers to set and the flavors to blend nicely.
- Serve the dip cups chilled with tortilla chips on the side for easy scooping and the best texture.
Notes
- Clear, short cups work best for this recipe. They show off the colorful layers and make dipping easier for guests. Avoid tall or narrow cups, as they make scooping difficult.
- Salsa, tomatoes, and olives release liquid over time. Always drain them properly before adding. This helps keep the layers firm and prevents a watery base.
- For clean, even layers, use the back of a spoon or a piping bag. Add each layer gently and avoid pressing down too hard.
- If refried beans feel too thick, mix in a small amount of warm water. If sour cream is too firm, stir it briefly to make spreading easier.
- For the best color and crunch, green onions and tomatoes can be added just before serving, especially if making the cups ahead of time.