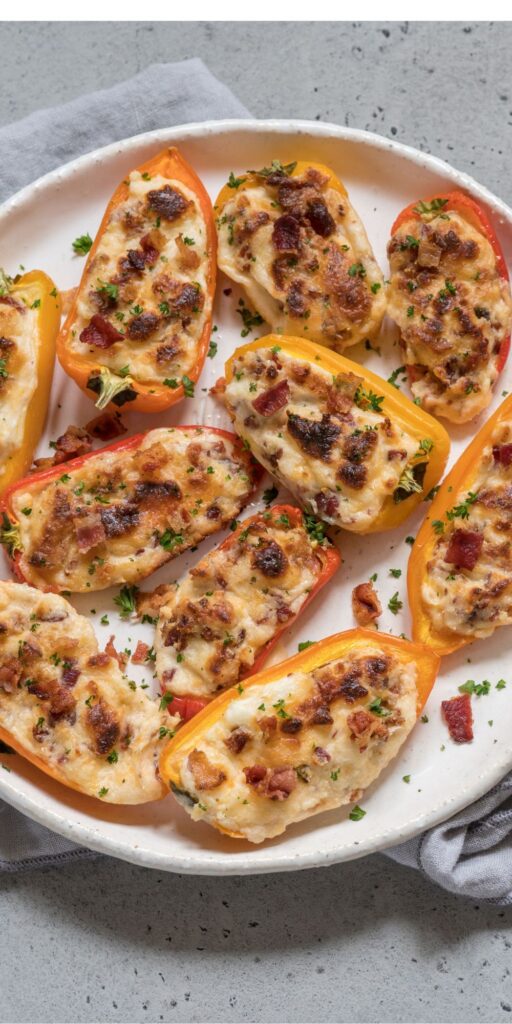
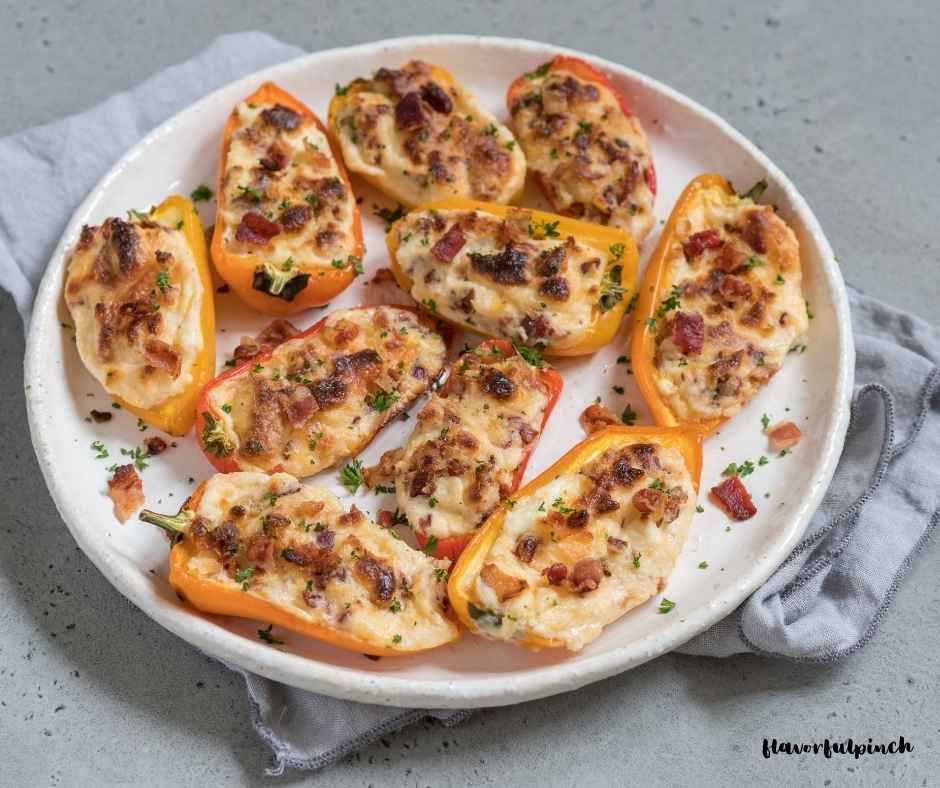
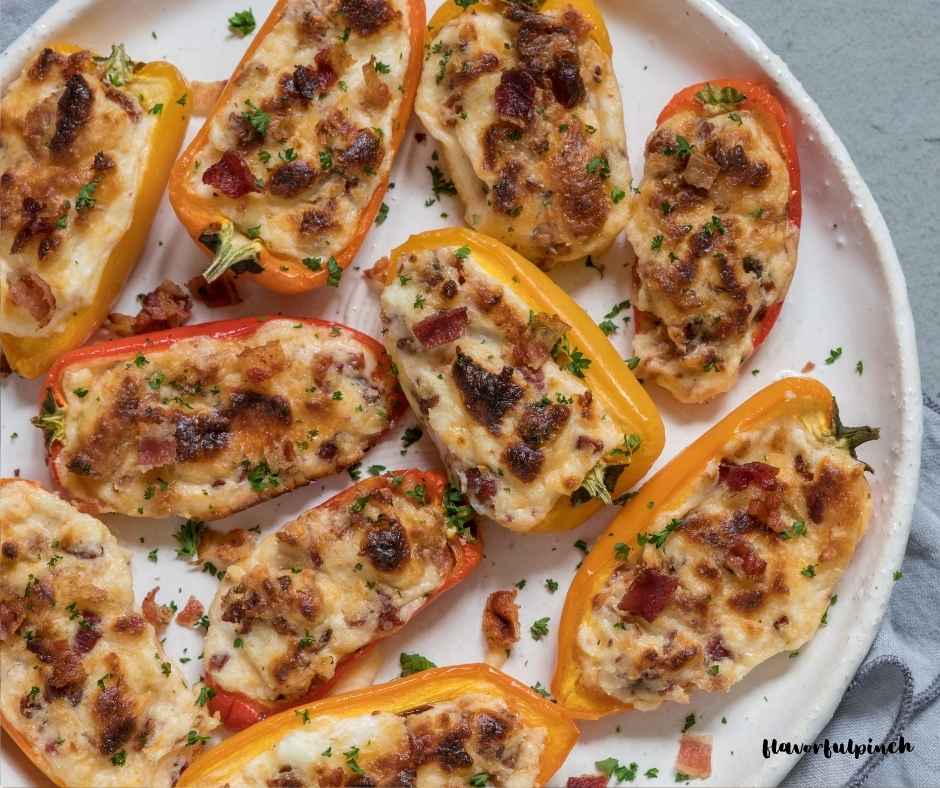
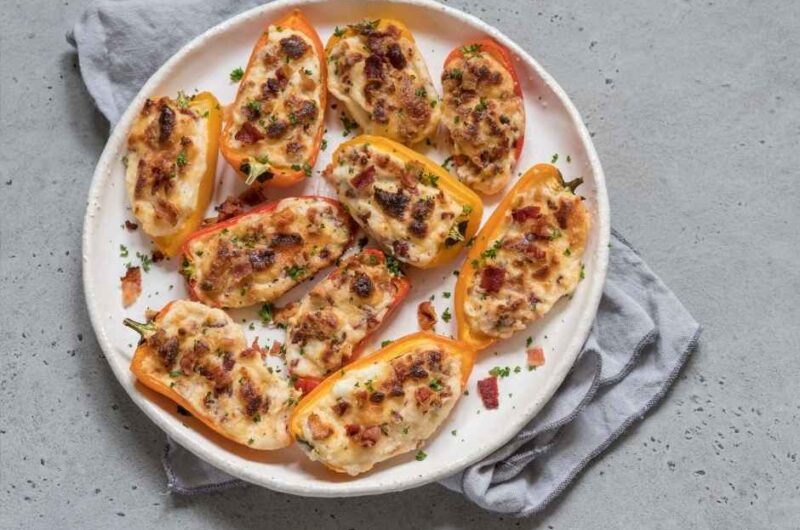
These Cheesy Bacon Stuffed Mini Peppers with herbs are an easy, flavorful bite-size finger food that works for almost any occasion.
Creamy cheese, crispy bacon, and fresh herbs come together in a simple appetizer that looks great and tastes even better.
They’re perfect for party platters, game night appetizer snacks, tailgate party food, and casual gatherings.
These stuffed mini peppers can be made ahead and served cold, making them ideal for low-carb snacks, stress-free hosting, potlucks, and buffet tables where easy grab-and-go snacks are a must.
Serve them as a finger food for parties, a cold appetizer for holiday spreads, or add them to appetizer boards and grazing tables.
Perfect for a tailgate, game night, or family get-together, these make-ahead stuffed peppers always disappear fast.
Handpicked For You
Bacon-Wrapped Jalapeno Poppers
Jalapeño Popper Smashed Potatoes
Seven Layer Taco Dip Cups- Easy Appetizer
Why You’ll Love It?
There’s a reason these stuffed mini peppers vanish at parties. In one bite you get:
- A sweet, crisp pepper shell that’s tender after baking
- A creamy interior with balanced richness and smoky bacon
- Melted cheese that oozes just right but doesn’t overwhelm
This combination makes them a true crowd‑pleaser, perfect warm from the oven or at room temperature during social gatherings.
Ingredients
6 mini sweet peppers, halved and seeded
4 oz cream cheese, softened
2 tbsp sliced green onions
4 slices cooked bacon, crumbled
½ tsp garlic powder
½ cup shredded cheddar cheese, plus extra for topping
1 tsp Worcestershire sauce
Chopped cilantro (optional garnish)
Tip: Let the cream cheese sit out for a bit. It mixes more smoothly and blends perfectly with the other flavors when at room temperature.
Step-by-Step Directions
- Preheat the oven to 400°F (about 200°C). Line a baking sheet with nonstick spray or parchment paper so the stuffed peppers don’t stick and cleanup is quick.
- In a medium bowl, combine the softened cream cheese, green onions, crumbled bacon, garlic powder, shredded cheddar, and Worcestershire sauce.
Use an electric mixer or sturdy spoon and stir until the mixture is smooth and evenly blended. - Take each halved pepper and fill it with about a heaping tablespoon of the cheese and bacon mixture. Press gently so each pepper holds a good amount but doesn’t overflow.
")
- Place the filled peppers on your prepared baking sheet. Sprinkle a bit of the extra shredded cheddar over the top of each one, then bake for 10–12 minutes until the cheese is melted, bubbly, and the peppers start to soften.
- Let them cool for a couple of minutes so the filling sets slightly. If you like, top with a little chopped cilantro before serving. These are best warm and gooey!
")
")

Easy Ingredient Switches
- Cheese Variations: Cheddar is classic, but you don’t have to stop there. Try pepper jack if you like a little kick, or mozzarella for a smoother, stringy melt that pulls apart beautifully.
- Add Some Heat: If you enjoy a spicy touch, it’s easy to turn up the heat. Finely chopped jalapeños, a sprinkle of cayenne pepper, or even a pinch of red chili flakes mixed into the filling will give these little bites a gentle but noticeable warmth.
- Herb Boost: Fresh herbs are an instant upgrade. Sprinkle in chives, parsley, or cilantro to the filling or on top before serving. Herbs add color, freshness, and a subtle aroma that brightens every bite. You can even mix in a small pinch of dried Italian herbs or oregano for a different flavor layer if you’re feeling adventurous.
- Smoky Options: Smoke lovers, this one’s for you. Try smoked cheddar for a richer, deeper flavor or a pinch of smoked paprika for a warm, subtle smokiness.
Homemade Worcestershire Sauce
You can make a quick homemade Worcestershire sauce by combining 2 tbsp soy sauce, 1 tbsp apple cider vinegar, 1 tsp molasses, a pinch of ground ginger, garlic powder, and a few drops of hot sauce.
Mix well and let it sit for a few minutes to let the flavors meld. Use it in place of store-bought Worcestershire in recipes for a tangy, savory kick.
Creative Twists
Crunchy Topping: Sprinkle panko breadcrumbs lightly on top before baking for a subtle crunch.
Extra Veg: Mix in finely chopped roasted red peppers or sautéed mushrooms for more depth.
Drizzle Finish: A light balsamic glaze or chili honey drizzle just before serving adds a gourmet touch.
Feel free to mix and match these suggestions based on the event or mood, they’re all compatible with the base recipe.

Grilling Option – Smoky Twist
If you want to avoid heating up your kitchen with the oven, these mini peppers can easily be grilled for a slightly smoky, charred flavor. Start by preheating your grill to medium-high heat so it’s hot enough to cook the peppers evenly without burning the filling.
Place the stuffed peppers cheese side up on a grill pan or directly on the grill grates. This keeps the creamy filling from dripping and allows the cheese to melt perfectly while the peppers cook.
Close the grill lid and let them cook for about 8 minutes, checking occasionally. You’re looking for the bottoms of the peppers to get a light char while the cheese mixture on top turns golden-brown and bubbly.
This method works great for outdoor parties, BBQs, or whenever you want that slightly roasted flavor without turning on your oven.
Serving and Pairing Ideas
These mini peppers are versatile. Serve them as:
- Appetizers at game day or holiday gatherings – they’re colorful, bite-sized, and disappear fast. Perfect for passing around on a platter or adding to a snack table.
- Side dish with grilled meats or BBQ – the creamy, cheesy filling complements smoky or charred flavors beautifully, making them a simple but flavorful addition to any meal.
- Snack with cocktails or wines – they’re a fun, easy-to-eat option that pairs well with drinks.
Make-Ahead and Storage Tips
If you’d like to prep ahead: stuff the peppers up to the point before baking and place them on a tray, covered, in the fridge. When guests arrive, just pop them in the oven — no last‑minute fuss.
Leftovers keep well for up to 2 days in an airtight container. Reheat gently in the oven or enjoy cold if you prefer. They also freeze well before baking; thaw overnight in the fridge and bake as usual.
Tips for Perfect Peppers
- Let it sit at room temperature or microwave for 10–15 seconds. Smooth cream cheese mixes easier and avoids lumps in the filling.
- Remove all seeds and membranes for tender, easy-to-eat bites. Trim a little of the stem so peppers sit flat on the baking sheet.
- Leave a little space at the top of each pepper. Overstuffing can make the filling spill over and prevents a nice golden finish.
- Sprinkle a bit of cheddar (or your favorite cheese) on the peppers before baking for a bubbly, golden crust.
- Let the baked or grilled peppers cool for 1–2 minutes before serving to let the filling set slightly.
Frequently Asked Questions
Q: Can I make them crunchy instead of soft?
A: Yes! To keep a bit of crunch, bake for a few minutes less or roast at a higher temperature for a shorter time. You’ll get tender peppers with a firmer bite, perfect for snacking.
Q: What’s the best way to serve them for a crowd?
A: Arrange them on a colorful platter with toothpicks for easy grabbing. You can even group them by flavor if you’ve added different cheeses or spices to some.
Q: Can I add other fillings to the cheese mixture?
A: Absolutely! Small diced veggies like mushrooms, sun-dried tomatoes, or roasted corn can be folded in for extra texture and flavor without overpowering the bacon-cheese combo.
Q: How do I prevent the cheese from spilling over?
A: Fill the peppers just under the top and press gently. Using a piping bag or small spoon helps control the amount, and topping with a little extra cheese right before baking seals it nicely.
Q: Can I make them bite-sized for kids?
A: Yes! Slice larger peppers into smaller halves or quarters and adjust filling accordingly. Mini portions are perfect for little hands and also make fun party bites.
Cheesy Bacon Stuffed Mini Peppers
Course: Appetizers12
servings10
minutes12
minutes22
minutesIngredients
6 mini sweet peppers, halved and seeded
4 oz cream cheese, softened
2 tbsp sliced green onions
4 slices cooked bacon, crumbled
½ tsp garlic powder
½ cup shredded cheddar cheese (plus extra for topping)
1 tsp Worcestershire sauce
Chopped cilantro (optional garnish)
Directions
- Preheat your oven to 400°F (200°C) so it’s ready to cook the peppers evenly. Line a baking sheet with parchment paper or lightly coat it with non-stick spray to prevent sticking and make cleanup easier.
- In a medium mixing bowl, combine cream cheese, green onions, crumbled bacon, garlic powder, shredded cheddar, and Worcestershire sauce. Stir everything together until smooth and well-blended so the filling is creamy and evenly mixed.
- Take your mini sweet peppers, halved and seeded, and remove any remaining membranes for a tender bite. Use a spoon to fill each pepper half with a heaping tablespoon of the cheese-bacon mixture, pressing gently so the filling stays in place.
- Sprinkle a bit of extra shredded cheddar on top of each stuffed pepper for a golden, bubbly finish. Place the peppers cheese side up on the prepared baking sheet and bake for 10–12 minutes until the cheese is melted, bubbly, and slightly golden, and the peppers are softened but not mushy.
- Remove the peppers from the oven and allow them to cool for 1–2 minutes so the filling sets slightly. Optionally, garnish with chopped cilantro to add freshness and a pop of color before serving warm.
Notes
- Use fresh, firm mini sweet peppers for the best texture and flavor.
- Keep all pepper halves roughly the same size for uniform cooking.
- Leave a little space at the top so the filling doesn’t overflow while baking.
- Leave a little space at the top so the filling doesn’t overflow while baking.
- Stuff peppers ahead of time and refrigerate; bake just before serving for convenience.